
There is no single “best gravel” for a driveway. There is a best gravel for each layer of a properly built driveway, and the contractor who treats a driveway as a layered structural section — rather than a pile of gravel dumped on graded soil — builds driveways that last twenty years instead of three. The difference between the two outcomes rarely shows up on the day the driveway is finished. It shows up the following spring, after the freeze-thaw cycles have worked the structure, after the first big rain has tested the drainage, after a season of repeated tire loads has either compacted the surface course tighter or worked it loose into the underlying subgrade. The driveway that was built in layers stays where it was put. The driveway that was built as one undifferentiated load of “gravel” is in the middle of its first round of repairs.
The reason layered construction works is that a driveway has to do four jobs simultaneously: carry vehicle loads to the underlying soil without overstressing the subgrade, shed water before it pools or saturates the structure, resist rutting and migration under repeated tire passes, and present a finished surface that is comfortable and serviceable for the owner. No single aggregate does all four jobs well. Coarse stone bridges weak soil and distributes load. Open-graded clean stone moves water through the structure. Dense-graded aggregate locks up under compaction and resists rutting. Decorative aggregate finishes the surface. The layered driveway uses each material for the job it is built for.
This guide is the contractor’s layer-by-layer reference for building a gravel driveway right. It covers subgrade preparation and assessment, when geotextile is justified and how to select it, the AASHTO size designations and applications for each layer, layer thickness and compaction discipline, estimating tonnage from area and depth, climate considerations that affect material choice, and — for the contractor producing aggregate from concrete demolition rubble or natural rock — the equipment configuration that turns a single feed pile into the multiple sized products the driveway section needs.
Komplet America has been the U.S. distributor of Komplet S.p.A. compact crushers, screeners, and shredders since 2018, and the Conti family construction legacy behind Komplet America stretches back to 1906. Driveway and hardscape contractors are a meaningful share of our customer base, and the layer logic in this article is the same logic our specialists walk through with customers sizing equipment for typical residential and light-commercial driveway production work.
The Quick Reference: Layered Driveway Section
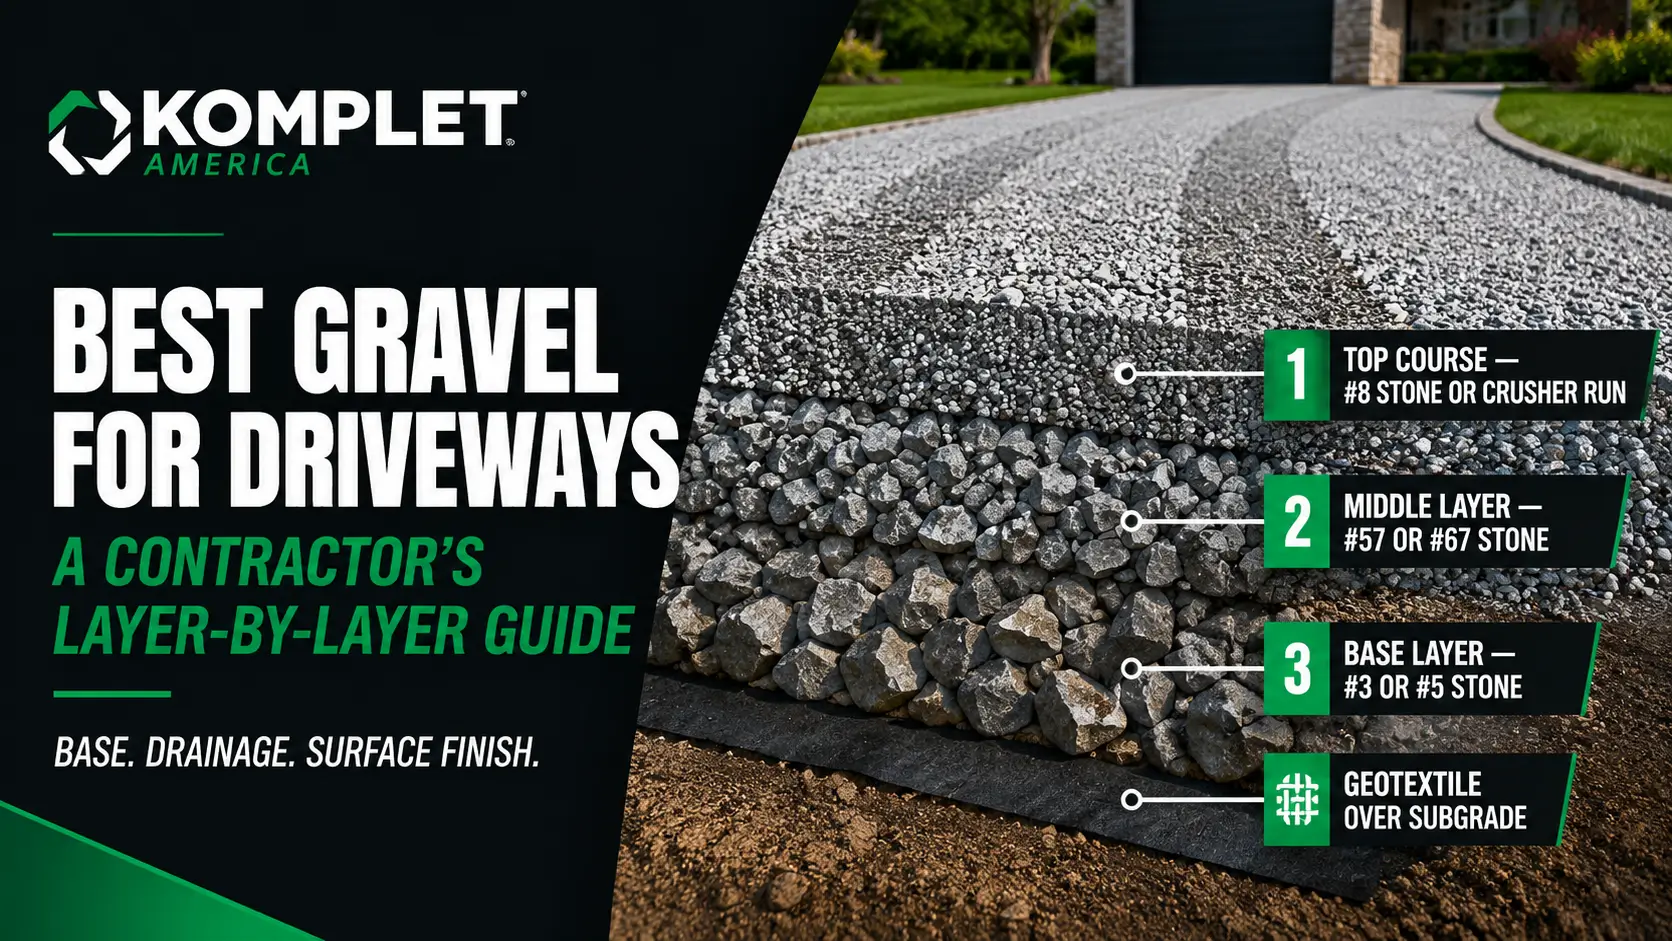
The standard layered section for a residential or light-commercial driveway, from bottom to top:
- Layer 0: Prepared subgrade. Strip topsoil and organics, identify and address soft spots, compact in place.
- Layer 1: Non-woven geotextile fabric (where the subgrade is wet, silty, or fines-rich). Optional on dry, firm subgrade.
- Layer 2: 4–6 inches of #3 or #5 stone — structural lift, used over weak or wet subgrade. Often omitted on dry, firm subgrade.
- Layer 3: 3–4 inches of #57 or #67 stone — intermediate drainage and load-distribution layer.
- Layer 4: 1–2 inches of crusher run, dense-graded aggregate, or regional equivalent — compacted surface course.
- Optional Layer 5: Decorative finish — #8 stone, chip seal, or top dressing for aesthetic or wear-protection purposes.
The total compacted thickness of a typical residential driveway is 6–10 inches, depending on subgrade conditions and vehicle loading. Heavy-duty driveways (commercial vehicle traffic, equipment access roads, RV pads) call for proportionally heavier sections — 12 inches or more is common, with engineered design for substantial loading. Specific layer thicknesses should be set by the engineer of record on any specified project; the layered logic above is the universal starting point.
Start With the Subgrade: The Foundation Beneath Everything
The subgrade is the natural soil beneath the driveway structure. It is also the single most underestimated factor in driveway performance. A perfect aggregate section over an unstable subgrade fails. A modest aggregate section over a properly prepared subgrade can perform for decades. Most driveway failures that show up within five years of construction trace back to a subgrade problem that was not addressed at the start.
Assessing Subgrade Conditions
A few practical assessment methods that don’t require formal soil testing:
- Walk the site after a heavy rain. Areas where water pools, puddles persist, or footprints squish reveal soft spots and drainage problems before any work begins.
- Check the soil texture. Sandy, gravelly soils generally drain well and provide firm bearing. Silty or clay-heavy soils hold water, lose strength when saturated, and can shrink and swell with moisture changes. Organic soils (peat, topsoil-heavy) compress unpredictably under load.
- Look for vegetation patterns. Mossy or marshy vegetation indicates persistent moisture even when the surface looks dry on the day of inspection.
- Probe with a steel rod or shovel handle. Resistance and feel give a rough sense of bearing capacity. Soft spots, fill areas, and buried debris show up clearly.
- Check for nearby drainage features. Slopes that direct water toward the driveway corridor, downspouts that discharge into or near the area, and grade lines that cause water to follow the driveway are all subgrade problems waiting to happen.
Subgrade Preparation
- Strip topsoil and organic material to undisturbed mineral soil. Topsoil retained beneath the driveway compresses unpredictably and decomposes over time, leaving voids and soft spots in the structure above.
- Identify and address soft pockets. Excavate, replace with structural fill (typically a #3 or #5 stone over geotextile), and proof-roll to confirm the fix.
- Compact the prepared subgrade with appropriate equipment for the soil type. A vibratory roller with smooth or padfoot drum is standard for cohesive soils; a static plate compactor handles small areas; a sheepsfoot roller is appropriate for clay-heavy soils. Achieve at least 95 percent of standard Proctor density (ASTM D698) for spec’d projects, or proof-roll until the surface no longer deflects under a loaded truck for residential work.
- Establish the cross-slope or crown for surface drainage. The aggregate above will follow the subgrade contour; a flat or reverse-slope subgrade creates a flat or reverse-slope surface that traps water.
- Cut perimeter swales or ditches if the driveway corridor needs to direct surface water away from the structure.
Climate-Specific Subgrade Considerations
- Northern climates (frost line below 24 inches): subgrade soils freeze and thaw seasonally. Frost-susceptible soils (silty, fine-grained) heave when frozen and lose strength on thaw. Drainage and aggregate depth matter more in frost climates than in temperate ones.
- Wet/coastal climates: persistent moisture in the subgrade requires more aggressive drainage and often deeper structural lift. Geotextile is rarely optional.
- Expansive soils (clay-heavy regions of TX, OK, parts of the South and West): clay soils swell when wet and shrink when dry, causing differential movement under the driveway. Subgrade preparation may require lime stabilization, removal and replacement, or specific structural design.
- Arid climates (Southwest, parts of the Mountain West): subgrade soils are typically firm and dry, with less aggressive drainage requirements. Lighter sections are often acceptable.
Geotextile: When It’s Essential and How to Choose It
Geotextile fabric placed between subgrade and aggregate prevents two failure mechanisms that destroy driveways over time: subgrade fines pumping up into the stone layers, and aggregate sinking into soft subgrade pockets. The fabric does not replace aggregate depth or compaction discipline — it complements them. The cost of geotextile is small compared to the cost of rebuilding a driveway that has lost its drainage function or its structural section.
When Geotextile Is Essential
- Wet, silty, or fines-rich subgrade. Without separation, fines migrate up into open-graded aggregate and clog the void space, converting a designed-drainage layer into a saturated, weak layer over 3–7 years of operation.
- Soft subgrade where aggregate is at risk of sinking. The fabric distributes localized aggregate point-loads across a wider footprint, protecting the soft soil from punching shear failure.
- Driveways over filled or disturbed soil where the soil profile is uneven and soft pockets are likely.
- Driveways over soils with documented frost heave or seasonal moisture issues.
When Geotextile Is Optional
- Dry, firm, gravelly subgrade with established surface drainage. The risk of fines migration is low and the bearing capacity is sufficient.
- Short driveways and light-duty parking pads where the cost of fabric exceeds the marginal benefit.
- Temporary driveways and construction site access roads with limited service life.
Selecting the Right Fabric
Two broad categories of geotextile are common in driveway construction:
- Non-woven needle-punched geotextile: the standard separation/filtration fabric for driveways. Manufactured by needling synthetic fibers into a felt-like mat. Allows water to pass through while preventing fines migration. Used in 80+ percent of driveway applications. AASHTO M288 Class 1, 2, or 3 designations describe specific weight and strength categories — Class 2 is the residential driveway standard.
- Woven geotextile: higher tensile strength than non-woven, used where the fabric needs to act as a structural reinforcement element rather than just separation. Typical applications include unstable subgrade requiring “mechanical stabilization” — areas where the fabric carries load directly. Common in commercial driveway and access road applications over very weak soil.
For most residential driveways over moderately wet or silty subgrade, a 6–8 oz/yd² non-woven needle-punched fabric performs well. For commercial driveways or driveways over very weak subgrade, a heavier fabric or a woven fabric is appropriate. Specific selection is best made with reference to the manufacturer’s technical data and any project specification.
Installation
- Place fabric directly on prepared subgrade with no folds or wrinkles.
- Overlap adjacent rolls by 12–18 inches; sew or stake overlaps where wind exposure or aggressive aggregate placement could displace the fabric.
- Avoid driving directly on the fabric. Place aggregate from the leading edge and work outward.
- Place at least 6 inches of aggregate before any compaction or vehicle traffic above the fabric.
Layer-by-Layer: Material, Depth, Compaction
Layer 1: Structural Lift (Where Needed)
Material: AASHTO #3 stone (2-inch top size) or AASHTO #5 stone (1½-inch top size). Both are open-graded clean aggregates with minimal fines. Choice between them depends on local availability and the depth of the lift; #3 is preferred for very weak subgrade because the larger stones bridge soft spots more effectively, while #5 is easier to work and compact in shallower lifts.
Depth: 4–6 inches typical for residential driveways over weak subgrade. Heavier loading (RV traffic, equipment access) may justify 8–12 inches. The structural lift is sometimes omitted on driveways over firm, dry subgrade — the layer is needed when the subgrade can’t carry vehicle loads at the design footprint without bearing failure.
Compaction: Open-graded structural lift doesn’t compact in the dense-graded sense — there are no fines to fill voids and bind the matrix. Instead, the layer interlocks under the weight of subsequent layers and traffic. Some operators choose to do a few passes with a vibratory plate compactor or roller to seat the larger stones; others let traffic and the weight of the layers above accomplish the same thing. Either approach is acceptable when the layer is thick enough.
Layer 2: Intermediate Drainage Layer
Material: AASHTO #57 or #67 stone. Both are open-graded with minimal fines; #57 has a 1-inch top size and slightly higher void ratio, while #67 has a ¾-inch top size and slightly tighter packing. Choice between them is largely driven by local availability and the application — see #57 Stone vs #67 Stone: A Contractor’s Guide to Choosing the Right Aggregate for the detailed comparison.
Depth: 3–4 inches typical. The intermediate layer serves multiple functions: it bridges the larger stones of the structural lift below, it provides drainage continuity through the section, and it presents a stable platform for the surface course above. Without this layer, the surface course can be displaced by the larger stones beneath.
Compaction: Like the structural lift, open-graded #57 or #67 doesn’t densify in the traditional sense, but the layer is typically rolled or worked with a plate compactor to seat the stones and produce a stable, smooth platform for the surface course. Heavy-duty compaction is unnecessary; the goal is even seating, not maximum density.
Layer 3: Compacted Surface Course
Material: Crusher run, dense-graded aggregate (DGA), DGABC, 2A modified, Item 4 Type 2, 21A, or whatever the regional dense-graded driveway product is called. All of these are graded blends of coarse stone, intermediate particles, and fines designed to compact into a tight, locked surface that resists rutting. See Crusher Run vs #57 Stone for Driveways for the detailed contractor-side comparison and the regional name guide.
Depth: 1–2 inches compacted. Place in lifts not exceeding 4–6 inches uncompacted, compact each lift before placing the next. Crusher run reduces in volume by approximately 15–25 percent during compaction depending on starting moisture and compaction equipment.
Compaction: This is where compaction discipline matters most. Crusher run requires mechanical compaction at near-optimum moisture content to achieve its design properties. Under-compacted crusher run will rut and require re-work within the first season. Optimum moisture content for most crusher run products is in the 5–8 percent range; the field test is feel — the material should clump when squeezed but not bleed water. If material is too dry, water sprinkle before compaction; if too wet, allow time for evaporation before final passes.
Compaction equipment for residential and light-commercial driveways:
- Walk-behind vibratory plate compactor (200–500 lb class): adequate for narrow residential driveways under 8 feet wide, small turn-around pads, and edge work where larger equipment can’t reach.
- Walk-behind reversible plate compactor (500–1,000+ lb class): better for wider residential driveways, parking pads, and approach aprons.
- Walk-behind double-drum vibratory roller: efficient for longer driveways where reach matters; produces consistent surface compaction.
- Ride-on tandem vibratory roller: standard for commercial driveways, longer residential driveways, and any work specified to a state DOT or municipal compaction standard.
Optional Layer 4: Decorative or Wear-Protection Finish
Some driveways finish with a thin layer of #8 stone, washed gravel, or chip seal for aesthetic or wear-protection purposes. The compacted crusher run base supports any of these options. A thin top dressing (½–1 inch) does not affect the structural performance of the section; it changes the appearance and the immediate driving feel.
Pavement-capped driveways receive their hot mix asphalt or Portland cement concrete surface course at this stage in lieu of the optional decorative layer. The compacted crusher run base is the binding layer between the gravel section and the bound pavement above.
Estimating Tonnage: Real Math for Real Driveways
Calculating how much aggregate a driveway needs is straightforward arithmetic, but the details — accounting for compaction, waste, layer-specific densities, and shape — separate the experienced estimator from the bidder who runs short on the third load. The general formula:
- Tons needed = Area (sq ft) × Depth (ft) × Density (tons/yd³) ÷ 27 + waste factor.
The Step-by-Step
- Measure length and width of the driveway in feet. Multiply for area in square feet. For irregular shapes, break into rectangles or use average width × length.
- Convert layer depth from inches to feet by dividing by 12. (4 inches = 0.333 ft; 6 inches = 0.5 ft; etc.)
- Multiply area × depth to get cubic feet of material.
- Divide by 27 to convert cubic feet to cubic yards.
- Multiply cubic yards by the density in tons per cubic yard. Typical compacted densities:
- Crusher run / dense-graded aggregate: approximately 1.4–1.5 tons/yd³.
- #57 / #67 open-graded clean stone: approximately 1.3–1.4 tons/yd³.
- #3 / #5 coarse open-graded stone: approximately 1.25–1.35 tons/yd³.
- Recycled concrete aggregate (RCA): typically 5–10 percent lower density than virgin equivalent.
- Add a 10–20 percent waste/compaction buffer. Crusher run loses 15–25 percent volume during compaction; open-graded stone loses 5–10 percent. Practical losses also include placement spillage, edge over-runs, and the inevitable corner where the lift came up an inch short.
Worked Example: Typical Residential Driveway
100-foot driveway, 12 feet wide, 1,200 square feet. Section: geotextile, 6 inches of #3, 4 inches of #57, 2 inches of crusher run.
- #3 stone: 1,200 sq ft × 0.5 ft = 600 cu ft. 600 ÷ 27 = 22.2 cu yd. 22.2 × 1.3 tons/yd³ = 28.9 tons. Plus 15% waste = 33.2 tons.
- #57 stone: 1,200 × 0.333 = 400 cu ft. 400 ÷ 27 = 14.8 cu yd. 14.8 × 1.35 = 20 tons. Plus 10% waste = 22 tons.
- Crusher run: 1,200 × 0.167 = 200 cu ft. 200 ÷ 27 = 7.4 cu yd. 7.4 × 1.45 = 10.7 tons. Plus 20% waste/compaction = 12.9 tons.
- Total: ~68 tons of aggregate plus 1,200 sq ft of geotextile.
Density numbers and waste factors vary by region and supplier. Local scale tickets from prior similar jobs are the best reference for fine-tuning the math.
Climate Considerations: Adjusting the Section
Cold-Climate Driveways
Driveways in regions with winter freeze cycles (frost line below 24 inches) need deeper structural sections to handle frost heave. Frost-susceptible silty subgrade can heave several inches in a single freeze event, lifting the aggregate section above. Design considerations:
- Increase #3 or #5 structural lift depth to at least 6–8 inches.
- Use geotextile aggressively to prevent fines migration during freeze-thaw cycles.
- Ensure positive drainage out of the structure — water trapped in the section freezes and expands, multiplying any drainage problem.
- Consider crowned cross-section that sheds water at the surface as the primary drainage path.
Hot/Wet Climate Driveways
Southeastern and Gulf Coast driveways face persistent moisture in the subgrade, heavy rain events, and (in some regions) clay-rich soils that swell and shrink seasonally. Adjustments:
- Geotextile is essentially mandatory.
- Subgrade preparation must address surface drainage emphatically — water that pools next to the driveway saturates the section over time.
- Consider increased structural lift depth (6–8 inches of #3 or #5) to handle saturated-soil bearing capacity reductions.
- Where expansive clay subgrade is present, lime stabilization or removal and replacement of the upper subgrade is sometimes appropriate.
Arid/Mountain Climate Driveways
Driveways in arid Western and Southwestern regions can typically use lighter sections because subgrade is dry, firm, and stable. Considerations:
- Surface drainage still matters — flash flood events and intense seasonal rains test sections that look adequate during normal weather.
- Wind erosion of fines from crusher run surface courses can be a maintenance issue; chip seal or polymer treatment of the surface helps in dust-prone areas.
- Frost depth varies dramatically by elevation; high-elevation mountain driveways need cold-climate sections even when low-elevation valley driveways nearby do not.
Resurfacing an Existing Gravel Driveway
Resurfacing is not a substitute for structural repair. New aggregate placed over an existing rutted driveway will rut again in the same places unless the underlying causes are addressed first. The diagnosis is the work; placing new gravel is the easy part.
The Resurfacing Sequence
- Walk the driveway and identify failure patterns. Wheel-track ruts indicate compaction or surface-course problems. Localized soft spots indicate subgrade issues. Persistent wet areas indicate drainage failure. Each pattern points to a different underlying cause and a different repair.
- Address drainage first. Restore or improve cross-slope and crown. Cut or restore perimeter swales. Verify that water from adjacent areas is being directed away from the structure, not into it.
- Excavate and rebuild localized failure areas. Soft spots typically require excavation to firm subgrade, geotextile, and structural lift before any resurfacing material is placed.
- Re-grade the existing surface to restore the design profile. Remove loose stone, level high spots, and fill low spots with the appropriate material.
- Place and compact the resurfacing material. For most resurfacing work, 2–3 inches of fresh crusher run, properly compacted, restores the driving surface. For driveways where drainage is a chronic problem, consider working an additional layer of #57 into the lower section before the new surface course.
Resurfacing Cost-Saving Opportunity
Driveway resurfacing is the application where on-site recycling math works best for hardscape and driveway contractors. The contractor demolishing an old concrete driveway at one job has the feedstock for the resurfacing material at the next. The contractor producing recycled crusher run-equivalent and #57-equivalent from in-yard concrete recycling has both products on hand for any driveway project. The economics depend on regional dump fees and aggregate prices, both of which have moved up substantially over the past several years. We cover the regional cost picture in our companion piece, Construction & Demolition Tipping Fees by Region: A Contractor’s 2026 Reference.
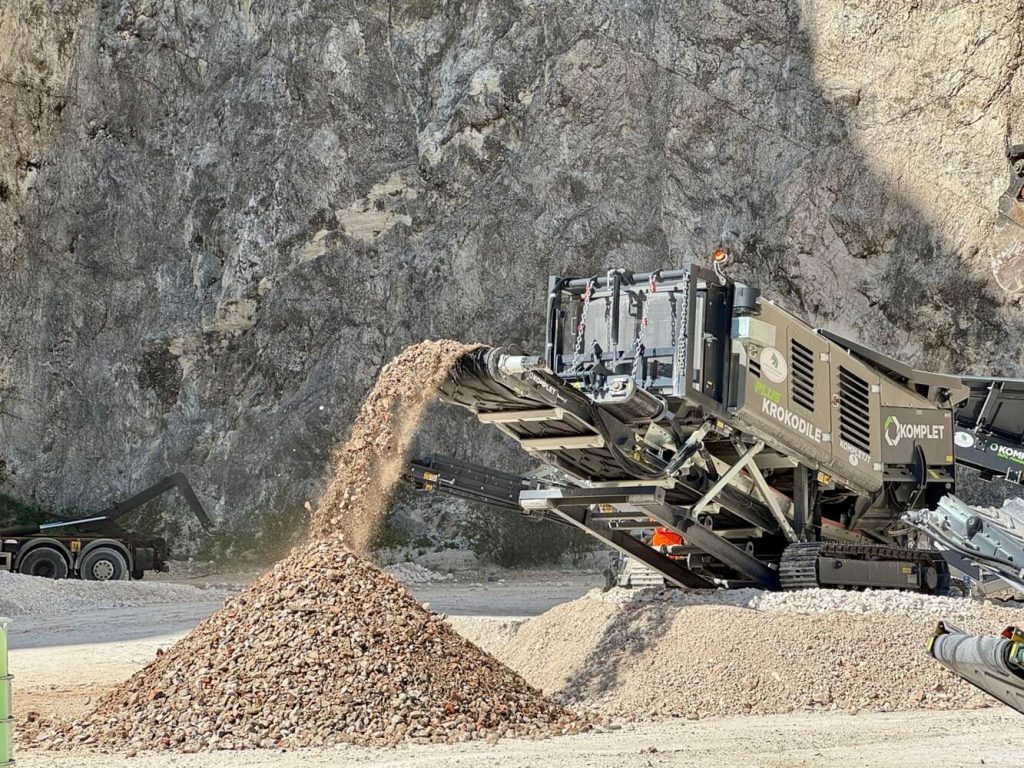
Producing Driveway Aggregate On-Site
For driveway and hardscape contractors, on-site or in-yard concrete recycling produces all the major aggregate streams a layered driveway needs from the same primary feed material. The economics work in regions with meaningful dump fees and aggregate prices; the operational discipline is matching screener configuration to target product mix. Compact mobile crushing and screening equipment, sized for typical contractor operations, handles this work without quarry-scale capital investment.
Equipment Configuration by Operation Scale
- Small operations (under ~5,000 tons/year of demolition rubble — typical hardscape and driveway contractor): the K-JC 503 mini mobile jaw crusher pairs with the Kompatto 221 vibrating screener for compact-yard production. The K-JC 503’s 19-inch by 12-inch jaw and up to 34 US tph throughput cover a typical hardscape operation’s annual rubble volume.
- Medium operations (5,000–25,000 tons/year): the K-JC 604 or K-JC 704 PLUS with the Kompatto 5030 heavy-duty vibrating screener handles higher-volume operations producing both for own use and for resale to other contractors.
- Larger operations (25,000+ tons/year): the K-JC 704 PLUS or K-JC 805 with Kompatto 124 handles in-yard recycling at small-quarry scale.
- All Komplet jaw crushers (K-JC 604 / 704 PLUS / 805) include integrated hydraulic magnetic belts for rebar separation during crushing. The K-IC 70 compact impact crusher produces a more cubical aggregate suited to applications where particle shape is a binding requirement (state DOT specs, ready-mix coarse aggregate).
- For oversize rubble and mixed C&D feed, the Krokodile PLUS slow-speed shredder pre-reduces material to a feed size compatible with the primary crusher.
Producing the Driveway Layer Stream
A typical driveway-aggregate production workflow:
- Crush concrete demolition rubble through the primary jaw crusher with the closed-side setting (CSS) configured to produce a top size that matches the screener’s top deck opening.
- Magnetic separation removes ferrous metal during crushing.
- Screen the crushed output across two or three decks. A typical configuration: top deck rejects oversize back to the crusher; middle deck captures the #57 or #67 envelope; bottom deck captures fines (which can be sold as stone dust or used as base material).
- Stockpile each product separately. Use a K-TC 460 portable mobile conveyor to extend stockpile reach and reduce cross-contamination between piles.
- Producing crusher run-equivalent: bypass the screener for an unscreened all-in product, or coarsely screen to remove only oversize. The unscreened or coarsely-screened output is functionally similar to virgin crusher run and accepted by most state DOTs as a substitute in base course applications (state-specific — see State DOT Specs for Recycled Concrete Aggregate).
Common Mistakes Driveway Contractors Make
Skipping the Subgrade Step
Placing aggregate over unprepared topsoil is the single most common avoidable cause of driveway failure within the first 3–5 years. The aggregate compresses unevenly into the soft topsoil, the surface develops rolling waves and ruts, and no amount of fresh top-dressing fixes the underlying problem. Subgrade preparation is not optional even on driveways that look firm at the start.
Using One Material for the Whole Section
“Just put down a load of crusher run” produces a driveway that lacks drainage and bridges no soft subgrade. “Just put down a load of #57” produces a driveway with no surface stability that ruts in the first season. Single-material driveways work only when the site doesn’t need both functions — typically dry, firm, well-drained subgrade with a single-purpose use case. Most residential driveways need both functions and benefit from layered construction.
Ordering Without a Compaction Plan
Crusher run requires mechanical compaction. Placing crusher run on a driveway without arranging for compaction equipment guarantees a sub-design surface that ruts in the first season. The contractor delivering crusher run on Friday afternoon and expecting traffic to compact it over the weekend is delivering a future callback.
Ignoring Drainage Around the Driveway
A perfectly built driveway section fails when water from adjacent areas — roof downspouts, driveway approach, neighboring grades — flows into or under the structure. Subgrade saturation from external water is a structural problem the aggregate section cannot solve. Surface drainage around the driveway corridor is part of the driveway construction, not an unrelated landscape detail.
Mixing Layered and Compacted Materials in the Wrong Order
The standard sequence is drainage below, lock-up above. Reversing the order — placing crusher run as the lower layer with #57 stone above as a decorative finish — traps water under the crusher run (which is essentially impermeable when compacted) and converts the open-graded surface into a saturated, weak layer. The standard sequence is universal across driveway, parking lot, and pavement design.
Frequently Asked Questions
What is the best gravel size for a residential driveway?
There is no single best size — different sizes serve different layers. AASHTO #3 or #5 stone for structural lift over weak subgrade; #57 or #67 stone for the intermediate drainage layer; crusher run (or regional dense-graded equivalent) for the compacted surface course; #8 stone for an optional decorative finish. The layered driveway uses each material for the layer it is built for, and the section as a whole performs better than any single-material attempt at the same problem.
How thick should each layer be?
Standard residential and light-commercial driveway: 4–6 inches of #3 or #5 stone (over weak subgrade — sometimes omitted on firm dry subgrade), 3–4 inches of #57 or #67 stone, 1–2 inches of compacted crusher run. Heavy-duty driveways with regular truck or RV traffic call for proportionally heavier sections — 12 inches or more of total compacted thickness is common. Specific layer thicknesses on spec’d projects should be set by the engineer of record.
Do I need geotextile fabric under a gravel driveway?
Geotextile is essential where the subgrade is wet, silty, or fines-rich. The fabric prevents subgrade fines from migrating up into the aggregate and prevents aggregate from sinking into soft pockets. Without geotextile in these conditions, the designed-drainage layer clogs over 3–7 years and the driveway loses its drainage function. On dry, firm, gravelly subgrade, geotextile is optional — the cost of fabric in those conditions exceeds the marginal benefit. AASHTO M288 Class 2 non-woven needle-punched fabric is the residential standard.
How much gravel does a typical residential driveway need?
Depends on driveway dimensions and section thickness. A typical 100-foot by 12-foot driveway (1,200 sq ft) with the standard layered section described in this article needs roughly 65–75 tons of aggregate plus the geotextile. Specific quantities should be calculated for each project using the area × depth × density formula. Add 10–20 percent waste/compaction buffer to the calculated quantity.
Should I compact each layer separately?
The structural lift (#3/#5 stone) and intermediate layer (#57/#67) are open-graded and don’t compact in the dense-graded sense — they interlock under traffic and the weight of subsequent layers. Some operators do a few seating passes with a vibratory compactor; most don’t. The surface course (crusher run) requires mechanical compaction at near-optimum moisture content — this is the layer where compaction discipline matters most. Place crusher run in 4–6 inch lifts, compact each lift before placing the next.
What’s the difference between a residential driveway and a heavy-duty driveway?
Heavy-duty driveways — RV pads, equipment access roads, commercial driveways with regular truck traffic — face higher tire loads, more frequent passes, and higher concentrated point loads (jack stands, leveling pads, axle loads). The design response is heavier sections (deeper structural lift, deeper surface course, larger top-size aggregate), more aggressive subgrade preparation, and often engineered design rather than rule-of-thumb sections. Residential driveway sections (6–10 inches total compacted thickness) are typically inadequate for true heavy-duty use.
Can I use recycled concrete aggregate in driveway construction?
Yes, in most U.S. states. Recycled concrete aggregate (RCA) performs comparably to virgin aggregate in driveway base course, drainage, and structural lift applications. State DOTs vary in their acceptance of RCA for state-funded projects; for private residential driveway work, RCA is broadly acceptable and often preferable on cost. The angular fracture surfaces of crushed concrete actually interlock better than naturally rounded gravel. On-site or in-yard production of RCA from concrete demolition rubble is the dominant economic story behind the rise of compact crushing equipment in the contractor market over the past decade.
How long should a properly built gravel driveway last?
A properly built gravel driveway with appropriate subgrade preparation, geotextile where needed, layered structure, and a compacted crusher run surface course typically performs well for 10–20 years with periodic re-grading and surface-course top-up every 3–5 years. Driveways that fail in the first 3–5 years almost always trace back to a layer logic problem from day one — skipped geotextile, missed structural lift, single-material section, or inadequate compaction.
What’s the cost of a typical layered gravel driveway?
Cost varies dramatically by region, length, width, subgrade conditions, and whether the contractor self-performs or subcontracts. Material cost alone for a typical residential driveway with a properly layered section runs in the low to mid four figures for a small driveway in a low-cost region; mid four to low five figures for a longer driveway in a high-cost region; higher when extensive subgrade preparation, geotextile, structural lift, edge restraints, or premium materials are required. Labor and equipment add comparable cost lines. Contractors producing aggregate on-site from concrete demolition rubble can substantially reduce the material cost line.
Final Thoughts
Building a gravel driveway right is layered work, in both the literal and figurative sense. Each physical layer of the section does a specific job; each step of the process — site assessment, subgrade preparation, geotextile selection, structural lift, drainage layer, surface course, compaction — addresses a specific failure mode. The layered driveway works because it acknowledges that no single material can do all the jobs the structure is asked to do.
The contractor who treats driveway construction as layered structural work — rather than as a load of gravel dumped on graded soil — builds driveways that last decades and produce the kind of repeat referrals that build a business. The contractor who treats it as commodity work paid by the load builds driveways that fail predictably, generates callbacks, and competes on price against the next contractor who is doing the same. The work is the same; the result is fundamentally different.
For driveway and hardscape contractors who are also doing demolition or renovation work that generates concrete rubble as a routine byproduct, the case for owning a compact crusher and screener has shifted from interesting to compelling. The same concrete demolition pile that used to be a paid-out cost line is the feedstock for the next layered driveway — and the math is most favorable in exactly the high-cost regions where premium-priced aggregate hits margin hardest. Komplet’s compact crusher and screener lineup is sized for this kind of contractor work, and our specialists are happy to talk through the equipment configuration that fits a specific operation’s project mix and target product output.
For broader context across the cluster, see our companion articles: Crushed Stone Grades: A Komplet Basic Guide to Aggregate Size and Use Cases, Crusher Run vs #57 Stone for Driveways, #57 Stone vs #67 Stone, The Hardscape Contractor’s Guide to On-Site Stone Production, State DOT Specs for Recycled Concrete Aggregate, and Construction & Demolition Tipping Fees by Region.
Ready to Produce the Driveway Aggregate Your Operation Needs?
- Talk to a Komplet specialist about pairing the right crusher and screener to your driveway project mix and rubble volume. Call 908-369-3340 or visit com/contact-us.
- Browse the full Komplet equipment lineup — crushers, impact crushers, screeners, conveyors, and shredders sized for compact contractor and recycling operations.
- Explore equipment financing through Komplet Capital — 24-hour approvals, terms from 36 to 72 months, 100% financing available.
- Consider a pre-owned Komplet machine — typical capital savings of 40 to 70 percent versus new, factory-supported by the same Komplet America service network.
Never enough.
Disclaimer: Stone sizes, layer depths, gradation names, AASHTO and ASTM specifications, geotextile classes, compaction standards, and approved uses vary by supplier, region, and DOT or project specification. Confirm gradation reports, project specs, and engineer of record requirements before ordering, selling, producing, or placing material. Estimating math is illustrative; tonnage, density, and waste factors should be confirmed against local supplier scale tickets and project-specific conditions. Cost ranges and economic comparisons are illustrative and based on industry patterns; actual results vary significantly by region, market, project specifications, equipment utilization, operator skill, financing terms, and many other factors. Operating, maintenance, and service guidance is general in nature. Always refer to the official Komplet operator’s manual for the specific machine model and serial number, and follow OEM intervals and procedures. For warranty-protected work, contact Komplet America at 908-369-3340 or your authorized Komplet dealer. Improper service or non-OEM parts may void warranty coverage and create safety hazards.